Headset Install Blocker

The Headset install blocker was explained to the wonderful CAD team this evening.

I explained that although I can see it on my device, I can’t get the APK to install. I think it’s because the APK is still in draft on the oculus store and I think it needs to be in an alpha channel for it to install. I have been spending the last couple of weeks trying various fixes such as sideloading etc but to no avail. I’ve passed it over for Al to download a zip file so that he can take a look at the unity file and see what is going on there. I’m now going through the actual submission process which seems a little long winded just to conduct some user testing on the Gear VR.

Stephen said he’d had a similar problem and he sent over his fix for his shelterbox app. This looks like instructions to play an android app on an oculus quest. I have theADB installer, installed and the device is set to developer mode but I think, because its a gear and not a quest, it is still wanting an .osig file.

Sarah installed the APK on her gear and it is redirecting to the Ocuclus store.. which is good news that its redirecting so maybe if I complete the alpha channel build then anyone with the link should be able to play the app.

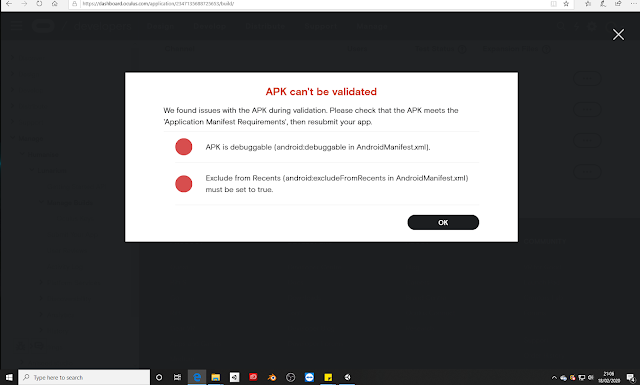
So, while I can ask Al to check out Stephens fix, I can also complete the Alpha channel set up. This is the current status:

I have a complete run down of the APK which oculus is flagging as APK Debuggable and Android manifest must be set to true.

From what I can understand, the APK is a kind of zip file which contains the android manifest. This indicated lots of essential things to do with the build and how the device will handle it.

https://stuff.mit.edu/afs/sipb/project/android/docs/guide/topics/manifest/manifest-intro.html

The APK must conform to oculus publishing standards… however, there also seem to be a number of bugs in the process which are known. Researching these indicated that the manifest can be set to true and set to debuggable via an APK tool,,, but I’m just not sure.

I going to check the build again as detailed on the oculus development and also the unity player settings as these might have been changed as I tried to change platforms to export to both standalone and webGL.

Alpha setup 
The application manifest of your mobile app must conform to our specifications if you want to upload the app to the Oculus Store.
Unity Application Manifests
The Unity Android project settings let you set some of the required application manifest options for building a mobile app suitable for the Oculus Store. To set the remaining manifest settings, use the Oculus Utilities for Unity 5 plugin.
The steps below describe how to configure Unity to build Oculus Store-compatible Android .apk packages.
Note: These steps only work for Oculus Utilities for Unity 5 version 1.10 and later.
  1. Click Oculus > Tools > Create store-compatible AndroidManifest.xml.
  2. Click Edit > Project Settings > Player.
  3. Expand the Other Settings properties, and select the Android tab.
  4. Under Identification, enter a unique name in the Package Name field. The package name must be unique within the entire Oculus ecosystem, but it must be similar to the app’s Oculus store title.
  5. Increment the Bundle Version Code. This value must always be greater than the value in the last build uploaded to any release channel.
  6. Set Minimum API Level to the following depending on your target device:
    • For Go: Android 5.0 ‘Lollipop’ (API level 21)
    • For Quest: Android 6.0 ‘Marshmallow’ (API level 23)
  7. Set Install Location to Automatic.
And 
Application Manifest Specification
Your AndroidManifest.xml file must meet the specifications outlined in the following: Android Manifest Settings.
For release:
  • For Quest and hybrid apps – Enable the headtracking feature per signing requirements of the app. For more information, see Application Signing.
    • For Quest (v2 signing): <uses-feature android:name=”android.hardware.vr.headtracking” android:required=”true” android:version=”1″ />
    • For hybrid Go/Quest apps (v1 signing): <uses-feature android:name=”android.hardware.vr.headtracking” android:required=”false” android:version=”1″ />
  • The package name should not be left as default or copy/pasted from another app. It must not be shared with any other Oculus Store app.
  • The installLocation must be set to auto.
  • The versionCode must be greater than the value used in a previous build of this app.
  • The android:debuggable value must be false. Your app must be a release version, not a debug version.
  • android:minSdkVersion, android:targetSdkVersion, and android:compileSdkVersion must be set appropriately. API versions greater the minimums specified prevent users from installing your app. For previously released app, use caution when changing the minSdkVersion as you may break compatibility for users on older versions of Android. For apps that target both Quest and Go/Gear with the same APK. minSDKVersion should be lower of the values, but the target and compile versions must align with the higher Quest values.
    Following are the accepted values for minSdkVersion, targetSdkVersion and compileSdkVersion by device:
Device
minSdkVersion
targetSdkVersion
compileSdkVersion
Go/Gear
21
21+
21+
Quest
23
25+
26+
  • Specify the correct intent category for the MAIN action:
    • For Oculus Go, use android.intent.category.INFO, and NOT android.intent.category.LAUNCHER so that your app appears only in Oculus Home and not the device launcher.
    • For Oculus Quest, android.intent.category.LAUNCHER is allowed.
  • The excludeFromRecents value should be set to true.
Note: Apps must specify installLocation=”auto” instead of installLocation=”internalOnly” or be rejected by the upload validator. This accommodates installing apps on SD card external storage. If you have a special circumstance and require a different install location setting, contact the store team at submissions@oculus.com.
Reserved User Interactions
Supported Devices
Oculus Go
Oculus Quest
Oculus Rift
This section describes input actions that are reserved for system-level functionality. This includes the following physical buttons: VolumeBack, and Home.
Reserved User Interactions
The Back button, Home button, and Volume button behaviors must conform to specific requirements.
Volume Button Interactions
Volume adjustment on the Oculus Android devices is handled automatically. The volume control dialog display is also handled automatically by the VrApi as of Mobile SDK 1.0.3. Do not implement your own volume display handling, or users will see two juxtaposed displays.
You may override automatic volume display handling if necessary by setting VRAPI_FRAME_FLAG_INHIBIT_VOLUME_LAYER as an ovrFrameParm flag.
Volume buttons are not exposed through VrApi interfaces.
Back Button Interactions
Back button presses are of three types: long-press, short-press, and aborted long-press.
Short-press back button behavior is determined by the application. It is typically (but not necessarily) treated as a generic back action appropriate to the application’s current state.
Back actions usually prompt apps to navigate one level up in an interface hierarchy. For example, a short-press on the back button may bring up the application’s menu. In another application, a short-press may act as a generic back navigation in the UI hierarchy until the root is reached, at which point it may bring up an application-specific menu, or enter the Quit Confirmation dialog, allowing the user to exit the application.
In applications built with Unity, if no satisfactory stateful condition is identified by the application, the short-press opens the Quit Confirmation dialog allowing the user to exit the app and return to Oculus Home. Applications built with other engines must implement this handling.
An aborted long-press results in no action, and when a timer is being shown cancels the timer.
When using the VrApi interfaces, the Back button will be shown to be down for a short press only on the frame that it is actually released. This prevents the app from having to implement its own short press detection.
Home Button Interactions
Home button press always opens a dialog to return the user to Oculus Home. As of Mobile SDK 1.0.4, this behavior is handled automatically by the VrApi.
If the Home button is held down on a Oculus Go controller, it will start a timer for a controller re-center. The Home button must be held down for 0.75 seconds for the re-center action to complete.
The Home button is not exposed through the VrApi interfaces, and no Android events will be passed to the app for the Home button.
Android Application Signing
Supported Devices
Oculus Go
Oculus Quest
Oculus Rift
You must sign the release version of your app with an Android certificate before you submit it for review.
Android uses a digital certificate (also called a keystore) to cryptographically validate the identity of application authors. All Android applications must be digitally signed with such a certificate in order to be installed and run on an Android device.
All developers must create their own unique digital signature and sign their applications before submitting them to Oculus for approval. For more information, see Sign Your App in the Android documentation.
Make sure to save the certificate file you use to sign your application. All subsequent updates to your application must be signed with the same certificate file.
Oculus uses v1 and v2 of 3 APK signing schemes. The version you should use is based on your app’s target device(s):
Target Device(s)
Signing Scheme Version
More Details
Quest only
v2
You must add headtracking feature to the manifest to sign as v2. For more information, see Android Application Signing.
Go
v1
The v1 scheme is based on JAR signing. See Application Signing (Android Docs).
Go and Quest
Sign as v1, but if app uses headtracking, mark the manifest with android:required=”false”)
Unity Settings for Android Application Signing
Unity automatically signs Android applications with a temporary debug certificate by default. Before building your final release build, create a new Android keystore and assign it with the Use Existing Keystore option, found in Edit > Project Settings > Player > Publishing Settings. For more information, see Android Player Settings: Publishing Settingsin the Unity documentation.
For Quest apps note that some versions of Unity 2017 do not support v2 signing. In this case, build to gradle, open your project in Android Studio and generate a v2 signed APK.